Tips for Using Clear Sheets Effectively in Your Projects?

In today's graphic design and project management landscapes, the use of clear sheets is gaining momentum. Clear sheets, or transparent overlays, are increasingly popular for organizing and presenting information. According to a report from Smithers Pira, the global market for packaging and printing materials using clear sheets is projected to grow by 3.3% annually, reflecting their versatility in various applications.

Using clear sheets effectively can streamline workflow and enhance visual communication. They allow for layering information and protecting essential documents. However, improper use may lead to disorganization and confusion. Designers need to carefully consider their placement and content. A poorly designed project using clear sheets can create a cluttered look, detracting from the intended message.

Attention to detail is crucial when working with clear sheets. Consider ink types and print clarity. In professional settings, 75% of designers have reported challenges in paper compatibility with clear sheets. This serves as a reminder that understanding materials is key. Embracing clear sheets means valuing both aesthetics and functionality. Thoughtful implementation can elevate your project to new heights.

Tips for Using Clear Sheets Effectively in Your Projects?

Understanding the Purpose of Clear Sheets in Projects

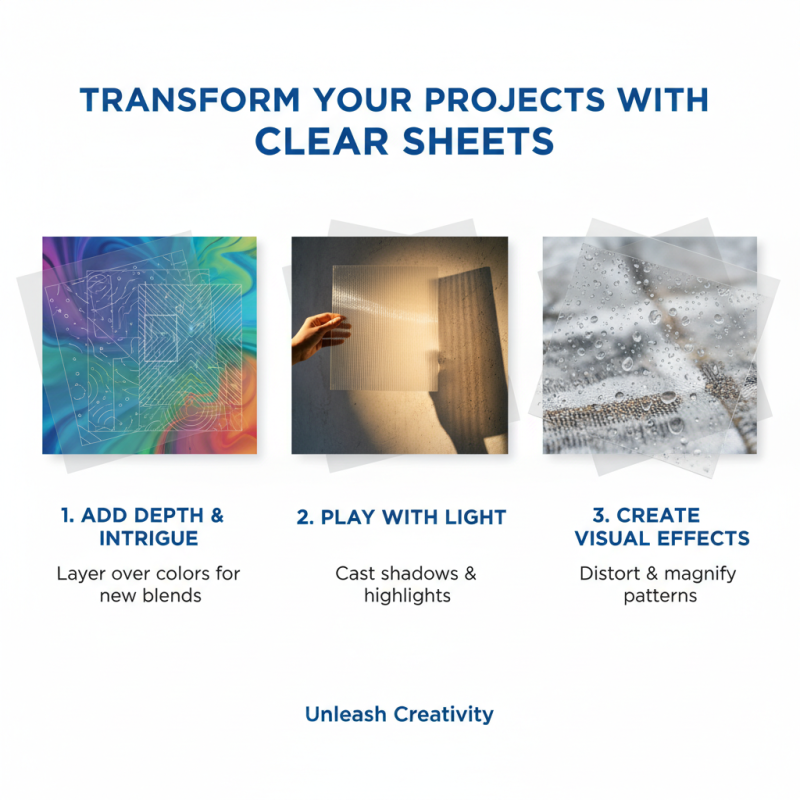
Clear sheets serve multiple purposes in various projects. They provide visibility while preserving the elements beneath. This is particularly useful in design presentations and educational materials. When layered correctly, projects become more interactive and engaging. Clear sheets allow for annotations, making ideas more transparent and understandable. Using vibrant markers or pens can transform these sheets into dynamic canvases of creativity.

However, their use can sometimes lead to cluttered visuals. Not every detail needs emphasis; excessive markings may overwhelm the viewer. It's crucial to find a balance. Too many elements can obscure the main idea, making it hard for the audience to grasp your message. Reflecting on what information truly matters is essential. Less may be more when it comes to clarity.

Lighting and background also play a significant role. A well-lit environment emphasizes the details on clear sheets. On the contrary, dim lighting can hinder visibility. Experimentation is key; trial and error often lead to the best results. Engage your audience, but remain aware of their needs. Clarity in presentation is ultimately what drives the success of any project.

Tips for Using Clear Sheets Effectively in Your Projects

This bar chart illustrates the importance of different qualities of clear sheets in project management based on user feedback.

Selecting the Right Type of Clear Sheets for Your Needs

When selecting clear sheets for your projects, consider their intended use. Different types of clear sheets serve unique purposes. For example, transparency is key for overhead projectors, while rigidity is important for display purposes. Think about where and how you will use them. A clear sheet that is perfect for one project may not suit another.

Choosing the right thickness can also make a difference. Thinner sheets are flexible and easy to handle; they work well for layering. Conversely, thicker sheets offer sturdiness for standing displays. Sometimes, we overlook how thickness impacts the overall presentation. Additionally, color can play a vital role. Clear sheets come in various shades, which can affect visibility. It's important to reflect on what the final product should convey.

Be mindful of the environment in which the clear sheets will be used. Factors like lighting can change how the sheets appear. Test samples to see how they look under different conditions. Remember, what seems perfect in your mind may not translate to reality. Experimenting with a few options can lead to surprising outcomes. Don't shy away from making mistakes; they often lead to the best results.

Techniques for Properly Aligning Clear Sheets in Designs

Aligning clear sheets in your designs can be a challenge. Precision is key to achieving a polished look. Start by measuring your base surfaces accurately. Use a ruler or a grid tool to mark alignment points on both the clear sheet and the underlying material. This not only helps with positioning but also reduces the chance of errors.

When placing the clear sheets, consider using light adherence at first. This way, you can easily reposition if needed. Adjustments are often necessary. A slight shift can make a significant difference. It’s good to periodically step back and assess the alignment visually. Sometimes, what seems straight up close appears off from a distance.

To improve your techniques, practice consistently. Experiment with different methods. Don't hesitate to make mistakes; each one is a learning opportunity. Use a lightbox for better illumination when aligning intricate designs. This can enhance your ability to spot misalignments quickly. Incorporate these tips in your projects, and watch your clarity and precision improve over time.

Tips for Using Clear Sheets Effectively in Your Projects? - Techniques for Properly Aligning Clear Sheets in Designs

Technique Description Benefits
Aligning Edges Ensure the edges of clear sheets are aligned perfectly with the base of your design. Creates a seamless look and enhances visual consistency.
Using Guidelines Set up a grid or guidelines on your design surface to allow for precise placement. Improves accuracy and reduces errors during assembly.
Light Source Alignment Position clear sheets to optimize the interaction with light sources in your design. Enhances the visual effects and overall impact of the project.
Layering Techniques Experiment with layering clear sheets of different opacities. Creates depth and complexity in designs.
Testing Stability Test the stability of clear sheets in your design before final assembly. Ensures durability and longevity of your project.

Creative Ways to Enhance Visual Impact Using Clear Sheets

Tips for Using Clear Sheets Effectively in Your Projects?

Using clear sheets can transform your projects. They add depth and intrigue. Layer them over colorful backgrounds. This creates new blends of color and texture. You can play with light too. Place a clear sheet in front of a light source. It casts interesting shadows and highlights.

Incorporating clear sheets into presentations is a fun idea. Imagine a clear sheet with minimal text. When placed over a vibrant design, it draws the eye. Viewers will focus on key points without distractions. Experimenting with various thicknesses can also yield unexpected results. Thin sheets flutter easily in the breeze, while thicker ones hold their shape.

It’s important to remember that not every idea will work. Some combinations may clash rather than complement. Reflections may also change with lighting. So take time to test different approaches. Reflecting on what worked or didn’t is vital. Then, adapt your strategy based on that. Embracing imperfection is part of the process.

Tips for Maintaining and Storing Clear Sheets Effectively

Clear sheets are versatile tools widely used in various projects. To ensure they last, proper maintenance and storage are key. Start by keeping them clean. Use a soft, lint-free cloth for wiping. Avoid harsh cleaners that could scratch the surface. For stubborn marks, a mild soap solution may do the trick. Remember, improper cleaning can lead to streaks and make future use frustrating.

When it comes to storage, avoid folding the sheets. Instead, store them flat between sheets of cardboard. This helps prevent creases. If space is an issue, consider using a protective portfolio. Ensure that temperature and humidity are controlled. Clear sheets can warp in extreme conditions. Assess your storage options periodically. Reflect on whether you need all the sheets you possess. This practice keeps your workspace organized and functional.